XCode version: 5
The Problem
Sometimes it is convenient for some apps, to be able to handle key and/or mouse events extraordinary.While handling key and mouse events in many frameworks are straight forward. It is for what ever reason unnecessary complex in osx cocoa, when using the NSViewController class. Osx cocoa developers are encourage to use the NSViewController for their apps, and out of the box, it is suitable for most apps without extraordinary key handling.
NSViewController inherits from NSResponder, so theoretically, it should be possible to handle key/mouse events just by overriding the methods keyDown, keyUp, mouseDown or mouseUp. In practice, it doesn't work, yeah. Googling the solution to the problem, can just as frustrating as the problem, because information is very sparse. Plus the answers, can be hard to interpret for new cocoa developers.
The problem is, even thou NSViewController inherits from NSResponder, it is not added to the responder chain when initialising. Only responders on the responder chain, is able to handle events. We have to add NSViewControllers to the responder chain, for being able to handle key and mouse events. The only problem is, NSViewController is not capable to do this, by it self.
For more about the responder chain see: https://developer.apple.com/library/mac/documentation/cocoa/conceptual/eventoverview/EventArchitecture/EventArchitecture.html#//apple_ref/doc/uid/10000060i-CH3-SW2
The Solution
Actually the best solution can be found here: http://www.cocoawithlove.com/2008/07/better-integration-for-nsviewcontroller.html
So what I'm going to do, is to emphasise the solution cocoawithlove.com and making it clear, by making a walkthrough of how to implement it.
In short, we are going to create a subclass of the class NSView. We are going to use methods on the NSView class, to add the NSViewController class to the responder chain. The tricky part is to connect the NSViewController to the NSView, but we will go through that.
The next steps, may for some experienced cocoa developers, be extremely elementary. So if you know how to setup project with NSViewController, you might want to skip to the section: Implement keyDown and mouseDown
Setting up project with NSViewController

Create new project, and select Cocoa Application.

Fill out the properties for the new project.

Select a nice place for the project.


We are prefixing with App, just to prefix with something, because ViewController is an invalid name. Make sure With XIB for user interface is checked. Press next, and then Create on next page.
Click on AppDelegate.m and correct the code to:
Press the Play button again, to see everything works. Close app again with stop button.
I guess many of you have this NSViewController structure in your apps already. Nevertheless, we have something to build on now.

If everything went okay, you should have a screen more or less similar, to the one above.
Test the app, by pressing the play button. A window should pop up. When you see the window, you should stop the app, by pressing the stop button.
We are going to create a NSViewController. Select AppDelegate.m(to make sure the files we are going to create, ends up the in right folder) and press ⌘n. Should your newly created files, end in the supporting files folder. You can just drag them up to the KeyAndMouseEventExample folder.

Select Objective-C class

Click on AppDelegate.m and correct the code to:
 //
 // AppDelegate.m
 // KeyAndMouseEventExample
 //
 // Created by Christian Henrik Reich on 01/01/14.
 //
 #import "AppDelegate.h"
 #include "AppViewController.h"
 @interface AppDelegate()
 @property (nonatomic,strong) IBOutlet AppViewController *ViewController;
 @end
 @implementation AppDelegate
 - (void)applicationDidFinishLaunching:(NSNotification *)aNotification
 {
   self.ViewController = [[AppViewController alloc] initWithNibName:@"AppViewController"bundle:nil];
   [self.window.contentView addSubview:self.ViewController.view];
   self.ViewController.view.frame = ((NSView*)self.window.contentView).bounds;
 }
 @end
Press the Play button again, to see everything works. Close app again with stop button.
I guess many of you have this NSViewController structure in your apps already. Nevertheless, we have something to build on now.
Implement keyDown and mouseDown
First we are going to create a subclass of NSView. Select AppDelegate.m(to make sure the files we are going to create, ends up the in right folder) and press ⌘n.
Select Objective-C class

Select AppView.h and correct the code to:
 //
 // AppView.h
 // KeyAndMouseEventExample
 //
 // Created by Christian Henrik Reich on 01/01/14.
 //
 #import <Cocoa/Cocoa.h>
 @interface AppView : NSView
 {
   IBOutlet NSViewController *viewController;
 }
 @end
Select AppView.m and correct the code to:
 //
 // AppView.m
 // KeyAndMouseEventExample
 //
 // Created by Christian Henrik Reich on 01/01/14.
 // Copyright (c) 2014 Christian Henrik Reich. All rights reserved.
 //
 #import "AppView.h"
 @implementation AppView
 - (void)setViewController:(NSViewController *)newController
 {
   if (viewController)
   {
     NSResponder *controllerNextResponder = [viewController nextResponder];
     [super setNextResponder:controllerNextResponder];
     [viewController setNextResponder:nil];
   }
   viewController = newController;
   if (newController)
   {
     NSResponder *ownNextResponder = [self nextResponder];
     [super setNextResponder: viewController];
     [viewController setNextResponder:ownNextResponder];
   }
 }
 - (void)setNextResponder:(NSResponder *)newNextResponder
 {
   if (viewController)
   {
     [viewController setNextResponder:newNextResponder];
     return;
   }
   [super setNextResponder:newNextResponder];
 }
 - (BOOL)acceptsFirstResponder {
   return YES;
 }
 @end
Select AppViewController and correct the code to:
 //
 // AppViewController.m
 // KeyAndMouseEventExample
 //
 // Created by Christian Henrik Reich on 01/01/14.
 //
 #import "AppViewController.h"
 @implementation AppViewController
 - (id)initWithNibName:(NSString *)nibNameOrNil bundle:(NSBundle *)nibBundleOrNil
 {
   self = [super initWithNibName:nibNameOrNil bundle:nibBundleOrNil];
   if (self) {
     // Initialization code here.
   }
   return self;
 }
 -(void)keyDown:(NSEvent*)theEvent
 {
   NSLog(@"Caught key event");
 }
 -(void)mouseDown:(NSEvent*)theEvent
 {
   NSLog(@"Caught mouse event");
 }
 @end
If you start the application, you will notice it is not working yet. We have to connect AppViewController to AppView's member viewController(See AppView.m), before it is working. Here comes the tricky and magic part :-)
Select AppViewController.xib
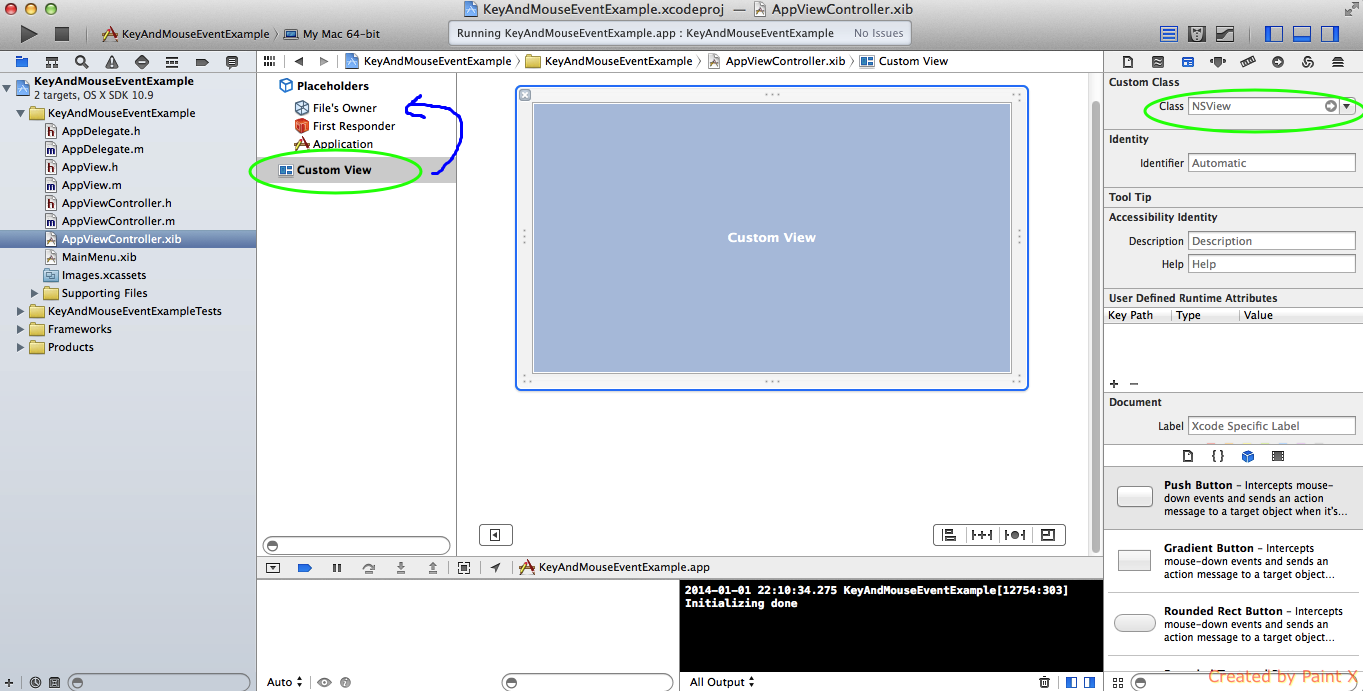
Select Custom View, and change Custom Class to AppView.
Select AppView formerly known as Custom View, it should be placed at the green circle to the left. Hold down control, and drag it to file owner.
On the outlet popup, select viewController
Press Play, to test the app. Click on the app's window, it should write "Caught mouse event" to output. Try to press some keys and see the "Caught key event" messages in output. As you might have noticed, handling of key events is not possible before, you have clicked the window once. Often it is best, if key events are available, when the app starts. To fix this issue, we have to set the first responder of the window holding AppView, to AppView.
It is done by adding
[self.window makeFirstResponder:self.ViewController.view];
At the end of the applicationDidFinishLaunching method in AppDelegate.m
So the AppDelegate.m looks like:
 //
 // AppDelegate.m
 // KeyAndMouseEventExample
 //
 // Created by Christian Henrik Reich on 01/01/14.
 //
 #import "AppDelegate.h"
 #include "AppViewController.h"
 @interface AppDelegate()
 @property (nonatomic,strong) IBOutlet AppViewController *ViewController;
 @end
 @implementation AppDelegate
 - (void)applicationDidFinishLaunching:(NSNotification *)aNotification
 {
   self.ViewController = [[AppViewController alloc] initWithNibName:@"AppViewController"bundle:nil];
   [self.window.contentView addSubview:self.ViewController.view];
   self.ViewController.view.frame = ((NSView*)self.window.contentView).bounds;
   [self.window makeFirstResponder:self.ViewController.view];
 }
 @end
That's it. For more about the NSResponderClass see https://developer.apple.com/library/mac/documentation/cocoa/reference/applicationkit/classes/NSResponder_Class/Reference/Reference.html#//apple_ref/occ/instm/NSResponder/keyDown:
Enjoy and happy developing.
Cheers,
Christian Henrik Reich
No comments:
Post a Comment